Friday, September 9, 2011

now, where was i...

oh yeah! sewing some shit! 
as you may know, rarely do i let a holiday pass without making a dress to match. well, this past weekend was labor day, and once again we spent it at the river house. so, learning my lesson last time (that dress will be off in 5 minutes once i see that water!) i whipped up a new patriotic swimsuit the night before! AND, i took (awkward) photos in it so you's guy's can stop askin ;)
good GOD. taking these was the most awkward moment of my entire week.

well, the top came from mccalls 2722. not really a vintage pattern (why did i say that? not at ALL a vintage pattern.) but view D really had it goin' on.
i was gonna put a close up of the top... but it felt creepy so
just use your imagination. unless you're a pervert.

the bottom i just drafted up. they are basically underwear with a tube sewn over it, it wasn't fucking rocket science or anything. i traced the bottom of a pair of panties i love to make sure my ass wouldn't be floppin' all over the river... but i think a cheek or two snuck out here and there.
i probably shouldn't have waited until the night before to make this... because i made two stupid mistakes. 
1) the center panel is soooooo not straight. while i doubt anyone would ever notice (besides a seamstress) the fact that i know it's there is enough to make me uncomfortably aware constantly.
or maybe i had a tumor on my right side i haven't discovered, and it's just pulling this funny...

2) i didn't put a zipper. or buttons. this entire thing is pull on, pull off and let me tell you, this fabric is NOT that stretchy! going pee right after swimming is almost impossible. its like sliding into a small wet paper bag. oh yeah, this isn't swimsuit material. just a stretchy tick gingham i had layin' around! so maybe it's more like three mistakes... lesson learned. again.

so i ALSO made this the other day for my friend shelby's shop, where, if you find yourself in san antonio, be sure to stop by it to pick up a few crissy baker originals. 
ok so here is the cheesy dress, myspace style:
"if i look to the side, people will think i'm deep"
"from way up here, the camera won't pick up all of my 300lbs"

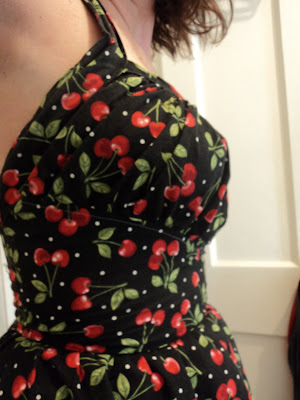
i can't find the pattern i made this from. its something old, like everything else awesome in this house. the boobs have pretty awesome cone-ability... but with a bra its a nice smooth chi-chi silhouette. it wasn't even 10 AM when i took these, so a bra and makeup just weren't gonna make it in these photo. not today bud, not today. 
kinda goin' back in time it looks like....

 the back was just a nice low halter... if i were keeping this, i would probably have done shirring or something nice and comfy back there.... its a bit snug.
as you can tell from my muffiny back?

ugh, i really wish i knew where the pattern was. currently my sewing room looks like this 
so there is no way of finding ANYTHING in there, and until i'm done with tommy and amanda's wedding, i probably won't even step foot in there.

...unless tonight i decide i need a new dress.

...which i probably will....

ugh.

Thursday, September 8, 2011

and now for something completely different


a wedding post! you know how sometimes you meet a couple who have been together for years and years and years and every time you see them, it's like looking at a couple who just started dating and are still in the puppy love stage and they are SO friggin' perfect for each other that it makes you want to barf
well, that's tommy and amanda.
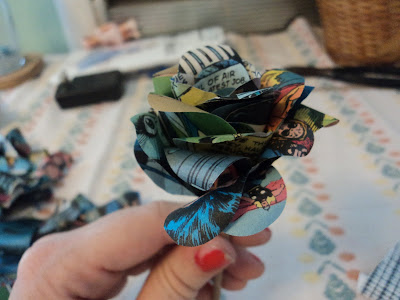
tommy and amanda are two amazing friends of mine who are getting married on saturday. technically i think they got married last year at the court house (something about loving each other so much they couldn't wait more than a month or so after getting engaged or something disgusting like that) but now they are having a big ol' ceremony and reception! i have the honor of making all of their floral arrangements for the wedding and i am so excited about the boutonnieres, i thought i would share them and also make a tutorial if someone else wants to make some like this too! 
first off-- check this shit out:
two things you need to know about tommy and amanda-
they love comics, and they are dance MACHINES!

so flowers made out of comic book pages really seemed fitting. tommy does some super cool artwork using comic books, plus it seems like he has quite the collection. so, here is how it's done ladies and gents:
- - - - - - - - - - - - - - - - - - - - - - - - - - - - - - - - - - - - - - - - - - - - - - - - 
step 1: gather up supplies
things you will need for sure:
-comics (durrrr)
-wire cutters
-about a 14 gauge wire, paper wrapped is better
-floral tape
-your trusty hot glue gun
-scissors
and if you want to make this same type i did, you will also need some greenery (i'm using rose leaves) and green hypericum (there is already so much color, green won't get so lost)

step 2: pick out your flower colors and get yourself some comic books
tommy and amanda's wedding colors are 'peacocky,' so we needed a lot of greens and blues. flip through the books and try to grab some where the main colors are something you need. thor and the x- men were blue and green enough for me. it is important that you watch what you're using. you don't want to use a page that is comic on one side and an ad on the other... which happens all the god damn time. 
not awesome
awesome

step 3: cut out 9 billion hearts
yep, just little ol' heart shapes! make them about 1-2" big, and make sure the two round tops are the correct colors on at least one side. they don't need to be perfect, the same shape, or the same size. if you didn't care about colors, it would take about 2 pages worth of  cut out hearts to make one flower. since i really, really care, i used about a dozen books to make 10 flowers.
you will go from this...
...to this!

step 4: check yo'self before you wreck yo'self

once you have them cut out, make sure the hearts are ok on both sides. i ended up not using a whole bunch i cut out because they were great on one side, but the other side ended up being too much of the wrong colors. while both sides won't always show, its easier if you just have all usable pieces.

step 5: roll the edges
this is the most annoying step. grab your paper rapped wire (or a kabob stick- that's what i used!) and gently roll the top of the heart, starting at the center so it doesn't tear anywhere. the side with the best coloring on it will be the side that the stick doesn't touch

next, fold it in half around the stick hot-dog style with the top curves facing away from each other
it should look like this....
but here is a video if i didn't describe it well... obviously the 'good side' i mentioned above is the big critter mug in the video
do all of the hearts before you start gluing. it's annoying, but easier when you start gluing

step 6: glue sticks are gooooooooooooooooooooooooo!!!
time for the glue gun! starting with the smaller hearts, you are going to glue them from the flower center, out. the first you use shouldn't be your favorites, because they are just gonna be little tubes.
it's easier if you just watch this video instead of me trying to describe this, but basically you just go in a circle gluing this shit down!
(side note in both videos in this tutorial--
don't criticize my lack of painted nails. not only does nail polish chip off after like, 1 hour because my nails don't know what shape they are supposed to grow in, but i also sewed off half of a fingernail last week and it looks gross, but if ALL my nails look chipped, maybe no one will notice!
also, i'm not a creep. yes, barry white is playing in the background while i make my internet videos, but the sam cooke station on last fm is the bomb. i can't help it.)

keep on adding until you are happy.... and after all that, hopefully you are somewhere around here:


step 7: tape time
hopefully that helped and now you are ready for the floral tape to bust out. if you haven't used floral tape before, here is a tip: pull it a little tight as you wrap and it will get sticky enough to stay. if you pull it TOO tight, your fingers will get sticky and you will most likely rip that shit up and get mad. so don't use your hulk strength for this step. start just under the flower, roll up, and then wrap to the bottom. 
make sure the 'stem' is the correct length before you wrap it all up.

step 8: trim your trimmins
you only need like, a leave and a tiny bit of hypericum. i went from this
to this and that already wasn't a full stem AND i cut it down a little more after i was done!
step 9: more tape, really.
get your trimmin's close to the base of the flower, and carefully wrap floral tape around it. the stems from these should be shorter than the length of the paper flower stem. once these are wrapped-- BAM! you are done! curl the bottom, pin that shit on and go get married

Thursday, September 1, 2011

from nerdy to flirty!

yesterday a wonderful wonderful woman i work with gave me this dress
'used to belong to a square dancer!

she got it at a yardsale forever ago for less than $1, but hasn't worn it in ages so she gave it to me! now, this is an ADORABLE dress, but on me, the length and fit made me look like a super nerd. it was a really awkward highwater length, and fitted strangely on the bodice AND it had a drop waist which, as i have mentioned before, i despise.
so here it is! after a quick revamp-- my new dress!
taa daaa!!!!!

isn't that just god damn adorable? ruffles and flowers and a big ol' bow in the back! look at the cute detail on the fabric!
d'awwwwwwwwwwwww
i do with the the person who made this originally had used a matching thread with the rick rack, but as an incredibly lazy person, i can understand seeing this as too much effort. seriously
well, with my new dress finished (i promise the crinoline doesn't hang down this far under it when i wear it...) i went out to run errands today and got lots of compliments from all of the old southern gent's i ran into at the grocery store. that must mean it was a success!